

If you haven’t done so yet,
I recommend you read “RAID systems – What are they and why on earth do we care” first!
Is my computer RAID compatible?
The first thing we need to check is if our computer has the ability of using Firmware RAID. The reason why I specify Firmware RAID is because every computer with Windows 7 or older (or certain Linux distros) and 2 or more hard drives is able to do Software RAID as it does not depend on specific hardware. Hardware RAID implies you already have a dedicated RAID PCI/PCI-E card and you know how to use it (and even if you didn’t, it’d be pointless to try and make a guide since every RAID card is different. If after the following you still have doubts about compatibility I recommend you read your motherboard’s manual in order to find out if it does have the capability for RAID.
What follows is a list of compatible chipsets (that covers the last 5-6 years) from Intel, AMD and VIA (remember, this is chipsets, not motherboards. All common modern day motherboards use a chipset manufactured by one of these 3 companies). that come with RAID functionality.
H87 – H97
P67
X79 – X99
Z68 – Z77 – Z87 – Z97
Essentially, all chipsets except Hx1 y Bx5 have integrated Firmware RAID. For older models please check your manual
A58 – A78
A85X – A88X
760G
970 – 990X – 990FX
Essentially, all chipsets except AM1 have integrated Firmware RAID. For older models please check your manual
VX(CX)700 – VX800(UT) – VX820(UT) – VX900 – VX900M
VT6410 – VT6420 – VT6421 – VT6421/A
VT8237 – VT8237R – VT8237R Plus – VT8237S – VT8237A – VT8251
Due to the nature of VIA systems, pretty much all chipsets have integrated Firmware RAID. For older models please check your manual
Unsure of what chipset you have?
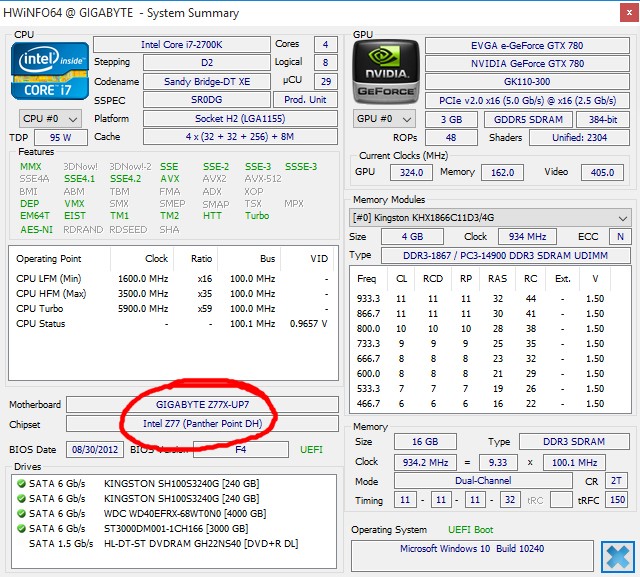
If your first thought is “this list is useless to me as I have no idea what chipset I have”, do not panic. You will not have to sacrifice a goat in some ritualistic fashion in order to find out, I have a simple solution! (and frankly, considerably less messy). HWiNFO will detect what chipset you have, you can download it right here!
Once installed, you’ll be able to identify your chipset (and see if it’s on the previously detailed list).
How do I enable RAID on my PC?
As mentioned in the previous article, there’s 3 types of RAID. Due to the fact that “Hardware RAID” (a dedicated PCI/PCI-E card) has hundreds of models and variations I will not go in to it since each one has their own installation and configuration process and in some cases it is not even possible to use the resulting RAID array as an operating system boot drive. Because of this, in this guide I will only show you how to configure and use “Firmware RAID” and “Software RAID”.
Firmware RAID:
Now that we’ve determined that our motherboard is based around a RAID compatible chipset we can move forward with the configuration. Due to the fact that most, if not all chipsets mentioned (except VIA chipsets) have a UEFI bios rather than a classic bios, I will be using UEFI screenshots to show you where to go. That said, the terms tend to be the same so if your compatible chipset is not UEFI enabled, you can configure RAID through classic bios by simply looking for the mentioned terms.
The first thing we need to do (which is VERY important) is save all data within the hard drives (or SSDs) elsewhere as drives that become part of a RAID array are wiped clean once the process is complete. Once we’re finished we can safely move the files back in to the resulting drive. Furthermore, if we’re doing a RAID array where the operating system will live in, (for example, 2x SSDs in RAID 0 for an ultra fast experience) we will need to reinstall Windows on it afterwards (obviously, since all files are deleted).
I’ll be using an ASUS motherboard for this guide. Note that all UEFIs change a bit in design depending on the manufacturer but the terms used tend to be the same so don’t let yours looking different discourage you (yes, I’m sure there’s a joke in there somewhere). Of course if you have any questions feel free to leave a comment at the end of the article.
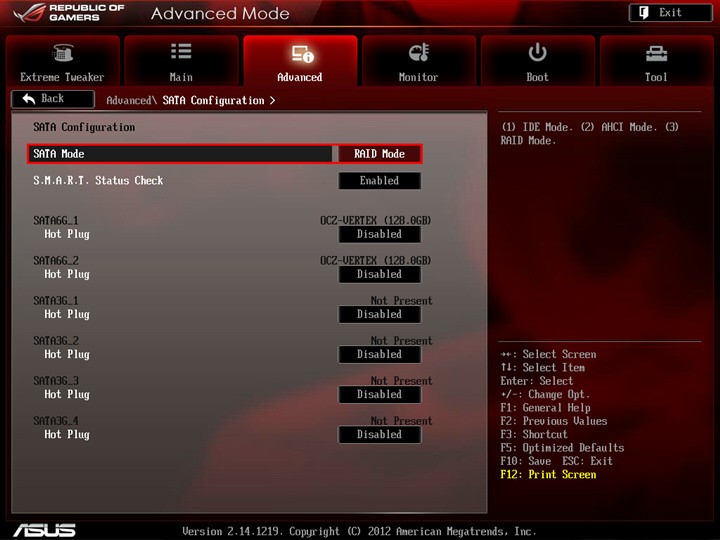
Step 1: Under the Advanced menu, configure the SATA to [RAID Mode] (by default it will normally be in IDE or AHCI modes).
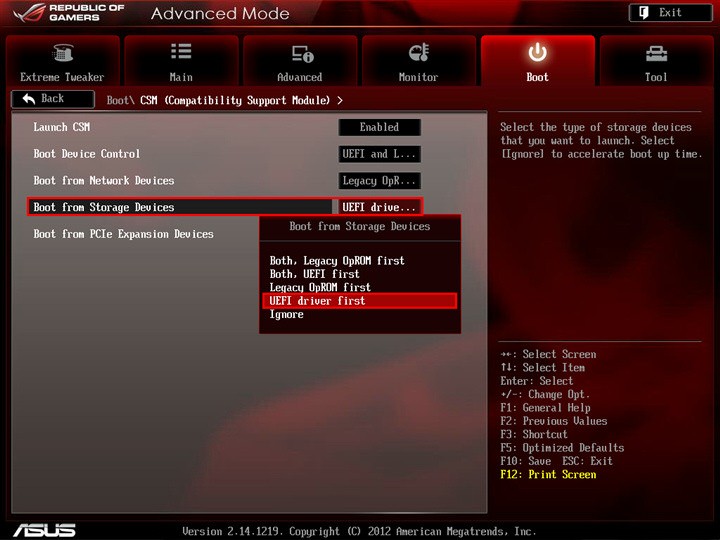
Step 2: Under the Boot/CSM section, set [Boot from Storage Device] from [Legacy OpROM First] to [UEFI Driver First], then press the “F10” key to save and exit.
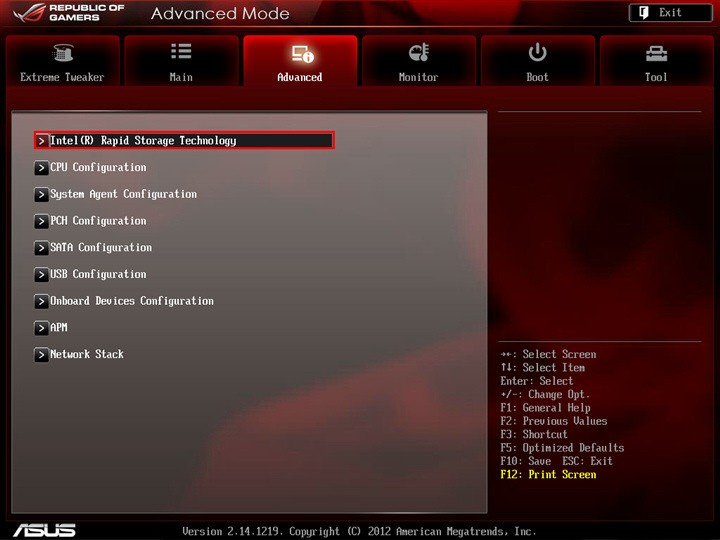
Step 3: Upon the next POST, re-enter the BIOS again, then you will see the following differences in BIOS options: For X79 series (for example, Rampage IV), you will find the [Intel(R) Rapid Storage Technology] menu under the Advanced menu, which did not show up before.
Step 3a: For Z77 series (Maximus V), just press the right key from the [Tool] tab and you will reveal additional UEFI options.
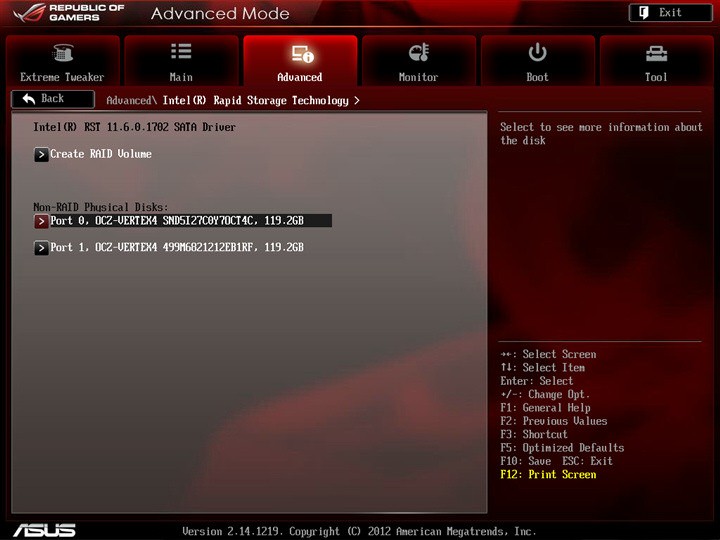
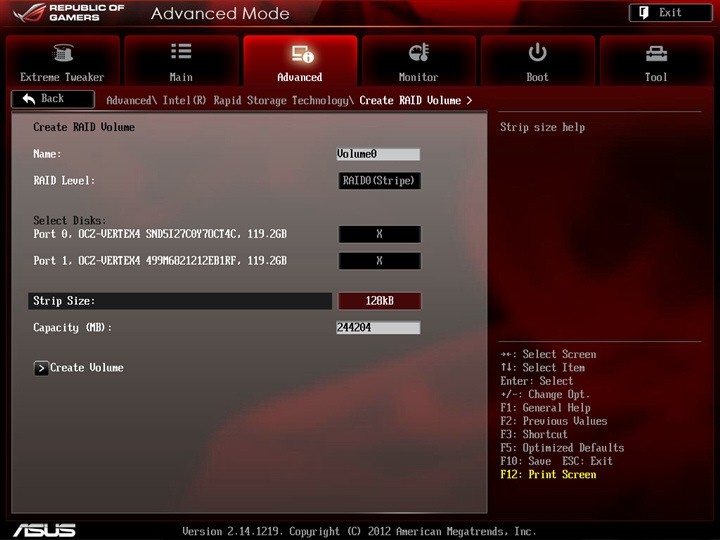
Step 4: Now we choose the type of RAID we want.
Step 5: and we select the settings. Generally speaking we want the biggest possible “Strip Size” and we can, if we want to, leave some of the available space out of the RAID Array to use as a traditional partition later on (though that doesn’t make much sense).
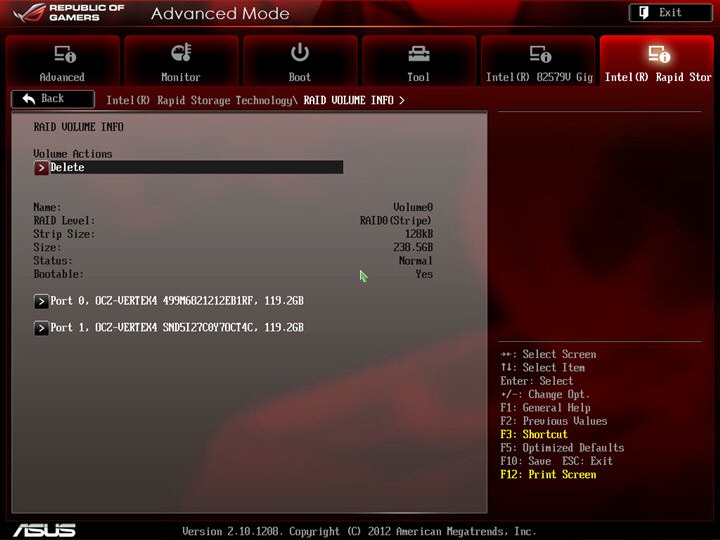
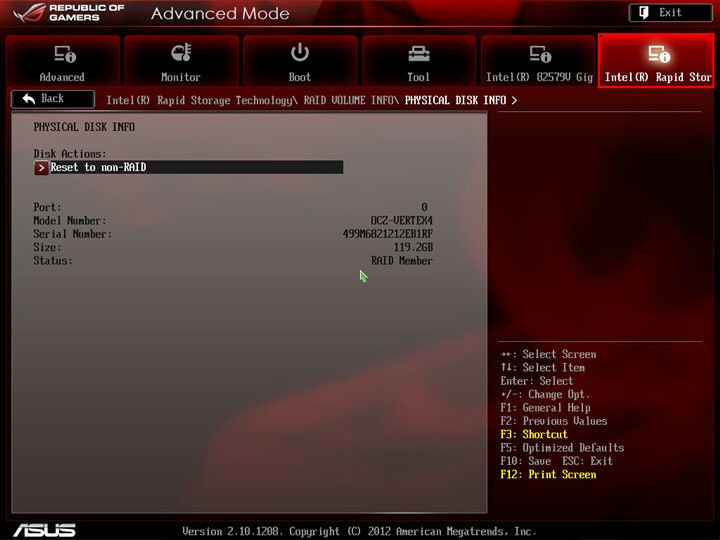
Step 6: …or delete them if we’ve made a mistake.
Step 7: After everything is done, save changes and exit. Your computer will now restart. If you’ve configured a RAID array that includes the drive where Windows lives you can now proceed and reinstall Windows as you would in a normal hard drive scenario. If you’ve only setup RAID on storage drives, you can now start Windows and you’ll see the resulting logical drive appear as a new drive in Windows and you’re all done.
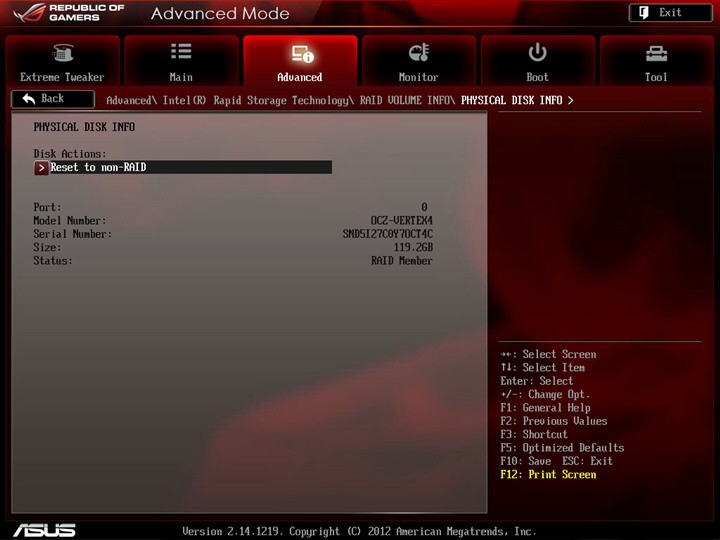
I have UEFI, I see the IRST OPTION but not the rest…
I have an Intel Chipset that’s mentioned in the compatible list, I have UEFI and I see the “Intel Rapid Storage Technology” (or IRST) option but I simply get the Enable or Disable options within it and thing else or I simply do not get any RAID creation options, just an option to enable it.
No problem, no need to panic. Many of modern motherboards place RAID configuration outside of the UEFI. arguably so it doesn’t depend on us installing an operating system in UEFI mode (which older operating systems do not support such as XP, Vista and in some cases, 7, in which case we would ignore Step 2 in the visual guide above).
If this is the case. We activate (or enable) “IRST” within the UEFI, save changes and reboot. Just after the first screen where we see the manufacturer logo or POST details if you do not have that enabled we will see a RAID Status screen which will enumerate all drives (but pay attention as this screen only lasts a second or two!) at which point we need to be pressing “ctrl+i” in order to enter the configuration screen.
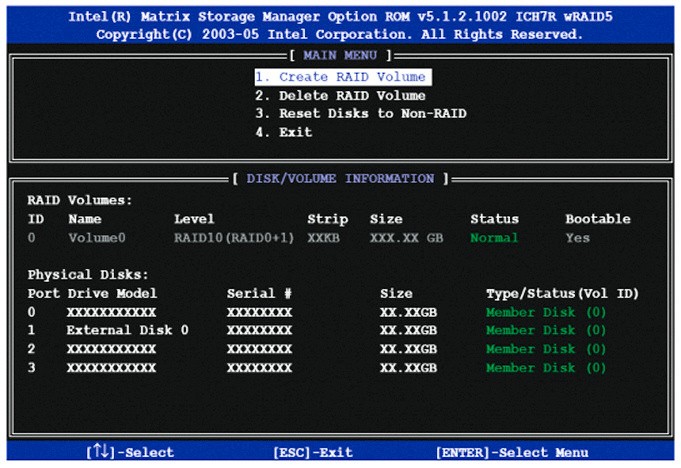
By constantly pressing “ctrl+i” and entering the configuration menu, the first thing we will notice is that it’s not as pretty as the UEFI interface but rather, looks more like an old MS-DOS program. You could say that this makes it simpler and straight to the point. At the end of the screen it tells us what keys to use to navigate the menu and we will be able to create our RAID array from here and you’ll notice it’s basically the same options as mentioned in the steps above, just not as pretty.
Once we’ve finished configuring our new RAID array, we save and reboot. At this point if you’ve had to reinstall windows (due to the fact that you’re using your newly created RAID array as a boot device (where your operating system lives) we need to go back in the UEFI or bios and tell it to boot from our new RAID array (it will appear in the hard drive list just as if it was one big drive).
Software RAID:
In order to explain how to use Software RAID I’ll be using Windows 7 as the example. The process is pretty much the same on Windows 8, 8.1 and 10 due to the fact that while visibly these operating systems may be different, their control panel options, in regards to drive operations, do not change.
Even though I did mention it in the previous article where I explain what RAID is and the types that are available, I will mention again that Software RAID only applies to storage drives due to the fact that Windows is required to already be installed since we need to go to its control panel in order to set RAID up, therefore only secondary drives can be added to the RAID array.
Software RAID is a decent option if we want to have redundancy for our files (aside from the fact that we should always keep our files in a secondary drive so if Windows gets corrup beyond fixing and we need to reinstall we will not have to worry about loosing them) or more speed if we’re using these secondary drives as program or game installation locations, specially if our motherboard does not have a RAID compatible chipset.
We should have in mind that if Windows stops working due to corruption, dead drive or any other reason or we simply wish to reinstall and start fresh, we will not be able to access our RAID array and therefore, our files straight up. HOWEVER, once our fresh new install of windows is finished we can simply go to “Control Panel – System and Security – Administrative Tools – Computer Management – Disk Management” and it will automatically detect that we had a previous RAID array in Windows and reconfigure it for us without loosing any files.
As you can see in the video, I show you how to setup RAID 1 (Mirror, for data redundancy). You’ll also notice other options and it’s entirely up to you which one to use (you can read the previous article for reference on what RAID to choose). For this to work, you’ll need 2 or more drives that have no partition (if yours do, simply select the partition and delete it, remember to move your files elsewhere first of course).
It’s worth mentioning this converts the selected drives to Dynamic drives which means we will not able to install any operating system on them (in case you where thinking about installing a secondary system on them).
And that’s it! I hope you found this guide helpful and of course if you have any questions about it or simply can’t figure out how to do it on your computer, feel free to leave a comment below.